Categories
Uncategorised

How Microsoft advises customers to back up data, including Azure DevOps.

Ensuring the safety and security of your data in Azure DevOps is crucial for the smooth operations of any organization. Microsoft, the provider of Azure DevOps, emphasizes the importance of backing up your data to prevent any potential loss or disruptions. Here are some key reasons why organizations should prioritize backing up their Azure DevOps data.

1. Microsoft’s Service Agreement

In the Customer Service Agreement, Microsoft explicitly advises customers to regularly back up their content and data stored on the Services using third-party applications and services. This proactive approach can help mitigate risks associated with data loss.

Microsoft Terms of Use: “We recommend that you regularly backup Your Content and Data that you store on the Services using Third-Party Apps and Services.”

Microsoft Services Agreement

2. Shared Responsibility Model

Microsoft operates on a Shared Responsibility Model, where both the provider and the customer have specific responsibilities. While Microsoft ensures the security of the service and infrastructure, customers are accountable for safeguarding their data and accounts. Understanding and fulfilling these obligations is essential for maintaining a secure environment.

Azure DevOps is hosted entirely on Microsoft Azure and is subject to the Microsoft Azure Shared Responsibility model.

Microsoft themselves stipulate, “for all cloud deployment types, you own your data and identities. You are responsible for protecting the security of your data and identities”.

“Whatever your approach, you should consider all data potentially “at risk”, no matter where it is or how it is being used. This is true for both data in the cloud as well as data stored in a private data center.”
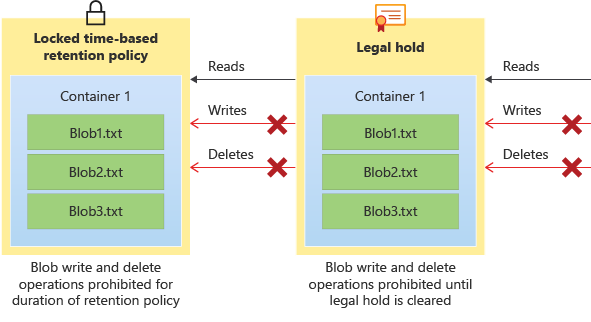
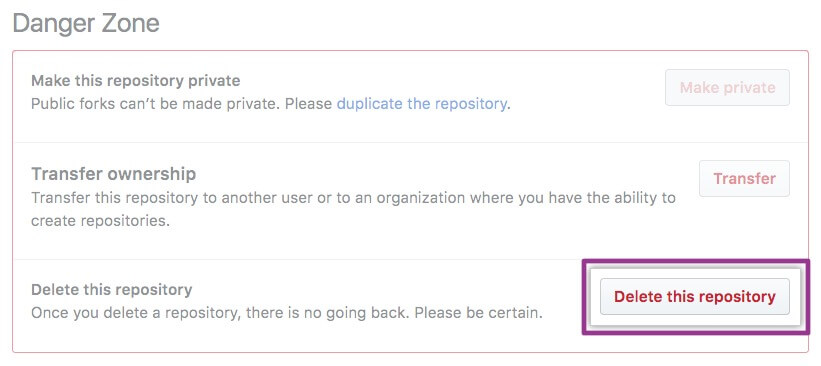
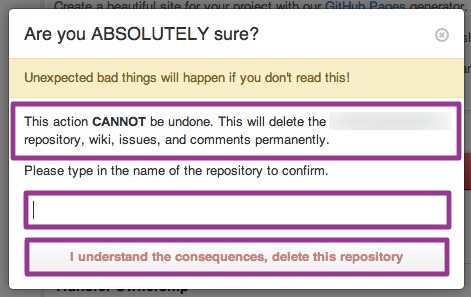
Shared responsibility in the cloud – Microsoft Azure | Microsoft Learn

3. Data Deletion

Deleted data in Azure DevOps may not be retrievable indefinitely. Microsoft cautions users that data may be permanently removed after a certain period. To avoid accidental data loss, it is recommended to back up your data consistently.

Microsoft openly warns, “Remember, we might get rid of data for good after it’s been deleted for a certain time. Always back up your data to avoid losing it by accident.”

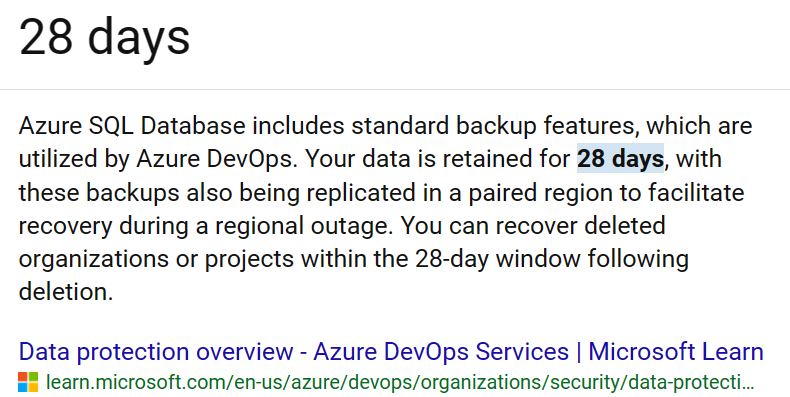
4. Microsoft 28-day Recovery Timeframe

Microsoft enforces a 28-day policy for recovering deleted files from projects. Beyond this period, data may be irreversibly lost if not promptly addressed. Timely backups can serve as a safety net in such scenarios.

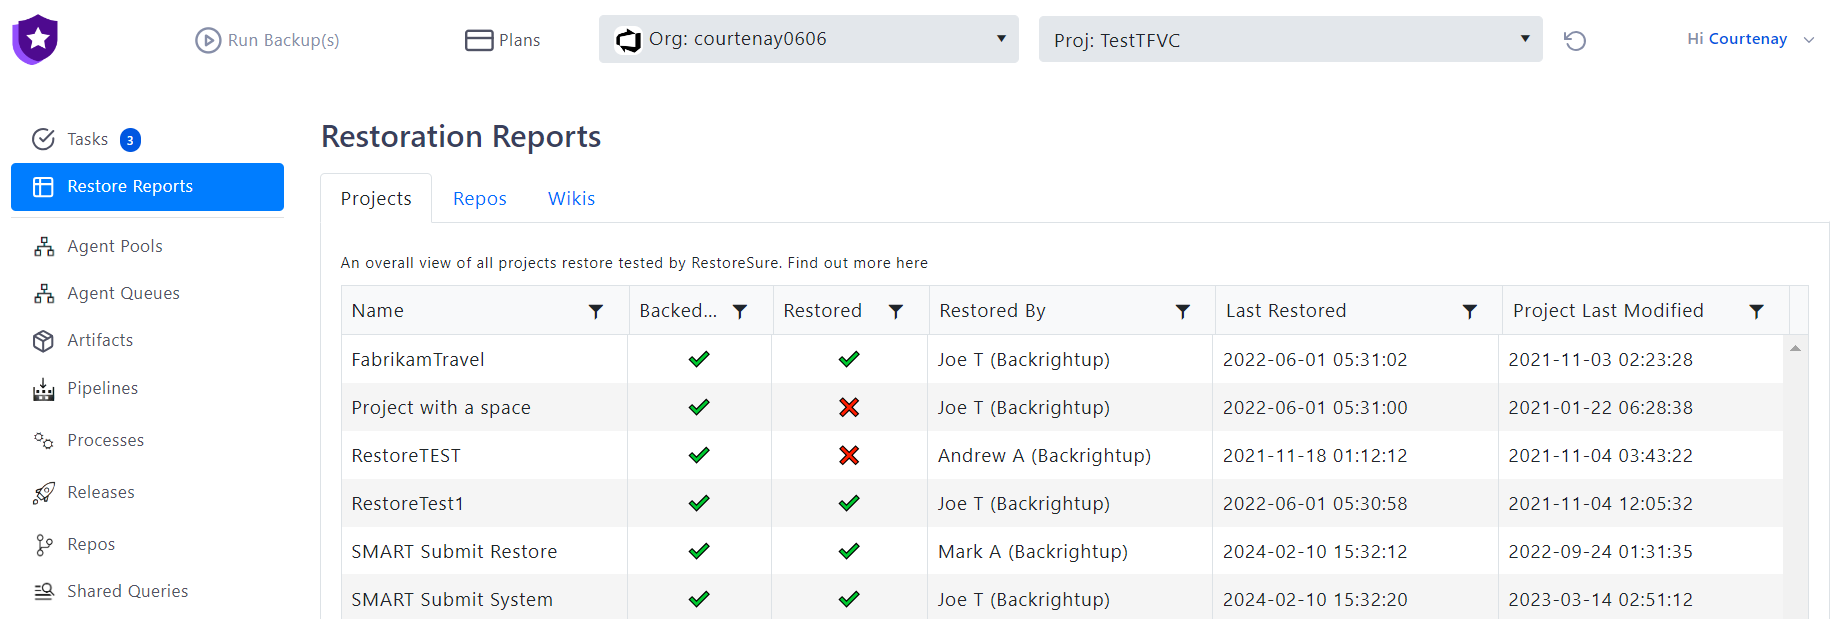
5. Organization-wide Restoration

In the event of data loss, Microsoft offers restoration at the organizational level rather than individual file recovery. Understanding this approach can influence the backup strategies implemented by organizations.

6. Support Response Time

Given Microsoft’s vast customer base, support response times can vary, days to weeks. Delays in addressing data loss incidents impact business continuity. Proactive data backups will reduce dependency on external support for data recovery.
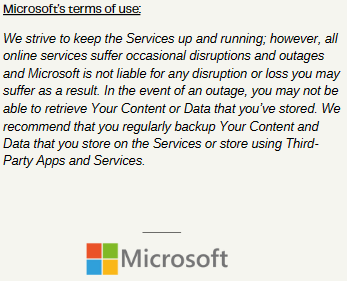
7. Outage Concerns

During service outages, retrieving stored content or data from Azure DevOps may not be feasible. This highlights the significance of having independent backups to maintain access to critical information.

Microsoft advice on outages in their documentation “In the event of an outage, you may not be able to retrieve Your Content or Data that you’ve stored.”

Conclusion

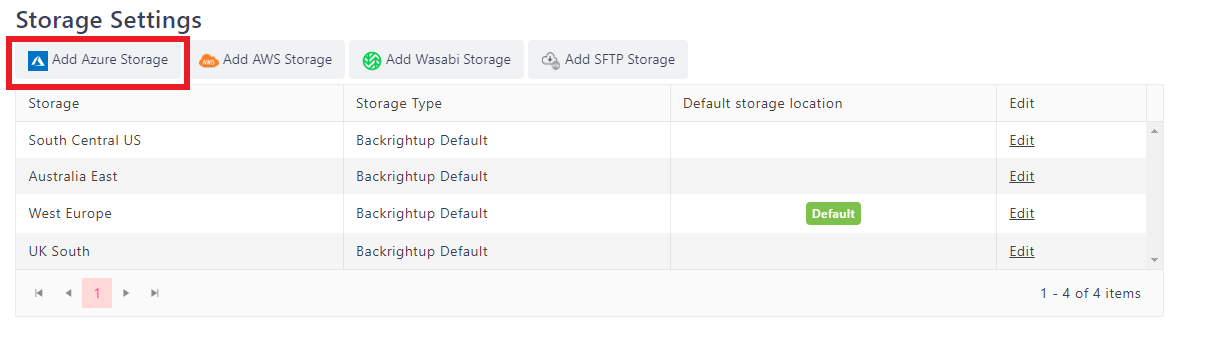
Microsoft encourages to explore reliable backup solutions for Azure DevOps. Backrightup offers global support for protecting Azure DevOps data, addressing issues for customers that are not be publicly disclosed but are prevalent in daily operations. Incidents that we hear of daily, such as project data deletion by a Financial Insurer employee and having to wait days before this organisation managed to get the right support. These incidents occur often and underscore the importance of organisations to be proactive in their own data protection measures.

By heeding Microsoft’s advice on data backup and leveraging third-party solution like Backrightup, organizations can mitigate risks to business continuity and safeguard their intellectual property stored in Azure DevOps.

Microsoft: “We recommend that you regularly backup Your Content and Data that you store on the Services using Third-Party Apps and Services,”.

If Microsoft advises their customers to back up their data with third party solutions to minimize the risks of business continuity, and there’s inexpensive solutions, verified by Microsoft, which protects critical data, what are you waiting for? – Contact Backrightup.com for an inexpensive enterprise-grade solution, used by likes of Assurant, Nuvei, Allianz, Isuzu, Department of Defense, Telstra to name a few, that ensures quick and seamless data protection.

Categories
Uncategorised

Customer Success Story: Financial Services DevOps Defense

Assurant is a US Fortune 500 Firm with millions of customers, tens of thousands of employees, and relies on thousands of repositories of code to help the entire organization function smoothly. They trust Backrightup to protect:

  • 5000+ Repositories
  • 1000+ Work Items, Pipelines, etc.

The Challenge

Assurant uses Azure DevOps across their organization and needed more protection than offered by Microsoft’s default 28 day policy. They also wanted a comprehensive solution that made restoring data as easy as backing it up. After assessing the price of building and maintaining an internal solution they realized it was more cost effective and secure to partner with Backrightup.

The Solution

Assurant selected Backrightup to provide daily, automated, secure backups for all the crucial data they keep in Azure DevOps. Assurant have a comprehensive backup, instant restore, and enterprise level support whenever they need it.

The Benefit

Comprehensive Backup

In addition to repositories we backup work items, pipelines artifacts, wikis, and more. Assurant knows their projects are more than just the source code, and it’s vital to maintain a comprehensive backup of the whole project.

Granular Restore

Assurant now have the ability to restore single repos, work items, or entire projects at once depending on their needs. Making sure they can easily restore what they want, when they need it, is just as important as backing it up in the first place.

Business Continuity

Assurant doesn’t want to let an Azure outage, an employee mistake, or a malicious actor cause downtime for their business. They know data loss doesn’t have to equal lost time with the right backup solution.

Categories
Uncategorised

Can AI Enhance Azure DevOps Backup and Restore Processes?

Backrightup are currently looking at ways Artificial Intelligence (AI) can transform the way we run our Azure DevOps backup and restore processes. Can we provide more advanced capabilities that significantly improve the efficiency and effectiveness of Azure DevOps backup and restore operations? Our findings show how AI not only can boost data protection strategies but also ensure high-quality, secure backup processes. Here’s how we think AI could play a crucial role across various facets of Azure DevOps backup and restore:

AI-Powered Monitoring and Predictive Capabilities

AI thrives in its role of continuously monitoring Azure DevOps backup environments. Leveraging historical data and ongoing trends, AI predicts potential system issues and storage needs before they pose a risk, allowing for:

  • Proactive identification of patterns indicating possible incidents, preventing data loss.
  • Forecasting resource demands to maintain efficient backups without disrupting ongoing operations.

Streamlining Operations through Automation

One of the core benefits of AI in Azure DevOps backup and recovery is automation. AI-driven systems enhance Azure DevOps backup processes by:

  • Scheduling backups intelligently based on the criticality and usage patterns of the data.
  • Optimizing backup timings to minimize the load on networks and systems during peak periods.
  • Ensuring backups are complete and data can be successfully restored without manual oversight.

Advanced System Assessments

AI technologies are adept at evaluating the health and performance of Azure DevOps backup systems, which includes:

  • Assessing the effectiveness of backup processes and recommending enhancements.
  • Keeping a check on the health of storage systems, signalling when maintenance or upgrades are required.
  • Evaluating how changes within systems impact backup and recovery operations.

Maintaining High Data Quality

AI ensures the integrity and quality of backup data by:

  • Detecting and resolving data corruption or duplication.
  • Regularly validating the integrity of backup data to match it with original sources.
  • Securing high-value or sensitive data through prioritization and secure handling.

Optimal Recovery Path Identification

In critical recovery scenarios, AI aids in making strategic decisions by:

  • Analyzing various recovery options and recommending the most efficient paths.
  • Selecting the best data storage solutions based on cost-effectiveness and accessibility.
  • Prioritizing the recovery of critical systems and data to reduce downtime during disasters.

Enhancing Data Recovery Processes

AI significantly boosts the recovery phase by:

  • Choosing the most relevant recovery points to minimize data loss.
  • Automating the recovery process to speed up the return to normal operations.
  • Learning from previous recovery experiences to continually refine future strategies.

AI in Security Monitoring

AI is indispensable for maintaining security within backup and recovery frameworks:

  • Detecting anomalies such as unusual access patterns or unexpected file changes that may indicate a security threat.
  • Triggering immediate alerts to facilitate rapid investigation and response.
  • Implementing adaptive security measures, including isolating compromised systems or restoring from uncontaminated backups.

Conclusion

Integrating AI into your “Azure DevOps backup and restore” strategy not only streamlines operations but also enhances data security and recovery capabilities. As organizations increasingly depend on Azure DevOps for critical operations, adopting AI-driven backup and recovery methods can be key for maintaining operational resilience and data integrity.

Categories
Uncategorised

Azure DevOps Protection: Safeguarding Your Code with Automated Backup and Restore Testing

Organisations heavily rely on Azure DevOps for their software development and delivery processes. However, ensuring the protection and integrity of the codebase is often overlooked by IT leaders without prior experience in backing up code. This article explores the significance of Azure DevOps backup and restore testing, emphasising the importance of not only data protection but equally disaster recovery strategies.

Understanding Azure DevOps Backup

Azure DevOps backup refers to the process of safeguarding your code, repositories, work items, build pipelines, and other critical components within the Azure DevOps platform. By implementing an automated backup solution, organisations can mitigate the risks associated with data loss, system failures, accidental deletions, or security breaches.

The Benefits of Automated Backup

Automated backup solutions in Azure DevOps offer invaluable advantages to IT leaders seeking to protect their code effectively:

  1.  Minimise Downtime: Automated backups ensure that valuable code and associated data are readily available for restoration, reducing downtime in the event of a system failure or data loss.
  1. Enhanced Data Protection: By automating the backup process, IT teams can eliminate human error and ensure that backups are performed consistently, minimising the risk of data loss.
  1. Improved Compliance: Many industries have regulatory requirements for data protection and disaster recovery. Automated backup solutions help organisations meet these compliance standards by providing a reliable backup and restore testing mechanism.

Restore Testing for Code Integrity

Implementing a backup solution is only one part of the equation. The ability to restore those backups is arguably more important. Especially when disaster strikes. Therefore, Regular restore testing is equally crucial to validate the integrity and recoverability of the backed-up code. By conducting restore tests, organisations can identify any potential issues or gaps in their backup strategy and make necessary adjustments or improvements.

Data Protection Strategies

To ensure comprehensive data protection within Azure DevOps, organisations should consider the following strategies:

  1. Incremental Backups: Instead of performing full backups every time, incremental backups only capture and store changes made since the last backup. This approach optimises storage space and reduces backup time.
  2. Offsite Backup Storage: Storing backups in the same location as the primary codebase can lead to complete data loss in the event of a catastrophe. Offsite backup storage ensures that backups are secure and accessible even in the face of physical damage or natural disasters.
  3. Encryption: Encrypting backups adds an extra layer of security, ensuring that sensitive code and data remain protected even if unauthorised access occurs.

Disaster Recovery Planning

In the event of a catastrophic failure or data breach, having a well-defined disaster recovery plan is crucial. IT leaders should consider the following aspects when formulating a disaster recovery strategy:

  1. Recovery Time Objective (RTO): The RTO defines the maximum acceptable downtime for your Azure DevOps environment. By setting realistic RTOs, organisations can prioritise the restoration of critical code and minimise the impact on productivity.
  1. Recovery Point Objective (RPO): RPO determines the maximum acceptable data loss in the event of a disaster. By aligning RPOs with business requirements, organisations can ensure that data is backed up frequently enough to minimise potential data loss.
  1. Documentation and Communication: A disaster recovery plan should be well-documented and communicated to all relevant stakeholders. This ensures a swift and coordinated response in the event of a disaster, minimising downtime and ensuring a successful recovery.

Protecting your code and associated data within Azure DevOps is paramount to maintaining business continuity and minimising potential risks. By implementing automated DevOps backup solutions, regularly conducting restore testing, and formulating a comprehensive disaster recovery plan, IT leaders can safeguard their code and ensure a smooth recovery in the face of adversity. Prioritising data protection and disaster recovery strategies with Azure DevOps will help organisations maintain their competitive edge when it’s needed the most. Contact [email protected] for more information.

Categories
Uncategorised

Azure DevOps Backups and Ransomware Protection with Immutability

In this blog, we delve into the critical importance of implementing proper backup and data protection measures within Azure DevOps, drawing a clear distinction between operating without backups versus with backups. Simply illustrating a scenario where an organization falls victim to a malicious actor’s infiltration, resulting in the compromise and deletion of crucial data from their Azure DevOps instance, akin to the unfortunate incident experienced by Microsoft in 2022. The consequences are preventative, ranging from operational disruptions and intellectual property theft to compliance violations and reputational damage.

With one social engineering attack, a malicious actor gains access to your Azure Devops instance. 

Just ask Microsoft who had exactly this happen to them in 2022.

With nefarious intent, the actor downloads your critical data and proceeds to delete it from your Azure DevOps instance.

In a blink of an eye, your organization’s valuable IP is compromised, and the attacker demands a hefty ransom for their return. Without any backups, you’re left scrambling to mitigate the damage and facing the daunting prospect of paying the ransom and losing crucial data. And that is not all. Your organization faces the consequences of:

  • Data Breach
  • Operational Disruption
  • Intellectual Property Theft
  • Compliance Violation
  • Financial Loss
  • Reputational/brand damage

Without any DevOps backup:

1. A malicious actor gains access to Azure DevOps. They can do this by:

  • Phishing Attacks
  • Credential Theft
  • Social Engineering 

2. They download all data and delete it from Azure DevOps.

  • The ease of such an attack ultimately depends on the effectiveness of the organization’s security measures and the attacker’s capabilities.

3. They are in a position of power to demand a ransom and compromise code.

Now, let’s consider the concept with Azure DevOps backup and data protection from Backrightup:

1. As a customer, you set up your Azure storage to enable the WORM (Write-Once, Read-Many) state – learn more at Microsoft’s documentation.

2. Add the storage to Backrightup, and your backups run daily. This is enabled in a few simple steps.

3. If a malicious actor deletes your Azure DevOps data you have your backups to restore from. In the case where they gain access to the backups themselves, with backup immutability via Azure storage, also known as WORM, even if they access your Azure storage (where the backups are stored), they cannot delete from it as it’s write-only (non-deletable).

Bulletproof Azure DevOps

It’s a quick and easy way, not to mention proven by the world’s largest organizations. The immediate strength of Backrightup with Azure Storage WORM state and making these simple changes include:

  • Mitigating Data Breach Risks and Operational Disruption: Setting up Azure storage with WORM state and integrating it with Backrightup for daily backups ensures that even if a malicious actor deletes critical data from Azure DevOps, the backups remain intact and non-deletable.
  • Safeguarding Against Intellectual Property Theft and Compliance Violations: Prevents potential data breaches and operational disruptions but also protects against intellectual property theft and compliance violations by ensuring data integrity and regulatory compliance.
  • Minimizing Financial Loss and Reputational Damage: In a ransomware attack, retaining backups helps minimize the risk of financial loss and reputational damage associated with paying the ransom or public disclosure of the attack.

Enhancing Resilience Against Cyber Threats: Enhance the ability to maintain data integrity, regulatory compliance, and stakeholder trust.

Conclusion:

The reality without backups, organizations are left vulnerable, scrambling to mitigate the fallout and potentially facing hefty ransom demands. Conversely, with Azure DevOps backup solutions like Backrightup, paired with Azure storage’s WORM (Write-Once, Read-Many) state, organizations can bulletproof their defenses. By seamlessly integrating daily backups and leveraging immutability features, they can effectively mitigate data breach risks, safeguard against IP theft and compliance violations, minimize financial losses, and enhance resilience against evolving cyber threats. The transformative power of embracing Azure DevOps backups underscores a pivotal decision in safeguarding your organizational assets and integrity, in a few steps.

Thankfully we are seeing more and more Azure DevOps leaders looking at ways to protect their most critical IP. For more information on how to protect Azure DevOps get in touch.

Categories
Uncategorised

Azure Devops Backups for SOC 2 compliance

In this article we will explore why backups, and more specifically why Azure DevOps backups, are crucial to your SOC 2 compliance.

SOC stands for System and Organization Controls governed by the AICPA (American Institute of Certified Public Accountants). SOC is a framework that helps organizations secure their systems and data. It ensures security, availability, processing integrity, confidentiality, and privacy. SOC compliance involves following the standards set in SOC reports:

  1. SOC 1: This report focuses on the controls relevant to financial reporting. It is commonly used for service organizations that provide services that could impact their clients’ financial reporting.
  2. SOC 2: This report focuses on controls related to security, availability, processing integrity, confidentiality, and privacy. It is widely used for technology and cloud computing organizations to demonstrate their commitment to safeguarding customer data and ensuring system reliability.
  3. SOC 3: Similar to SOC 2, but it’s a general-use report that provides a high-level overview of the organization’s controls and can be freely distributed.

For the purposes of this article we will be focussing on SOC 2 compliance.

What is SOC 2 compliance?

This report focuses on controls related to security, availability, processing integrity, confidentiality, and privacy. It’s widely used by tech and cloud computing firms to show commitment to customer data security and system reliability.

SOC compliance involves undergoing an audit conducted by an independent third-party auditor who evaluates the organization’s controls and issues a report detailing their findings. Achieving SOC compliance demonstrates to customers, partners, and stakeholders that the organization takes data security and privacy seriously and has implemented effective controls to mitigate risks.

What is the difference between SOC 2 Type I and Type II compliance?

The difference between SOC 2 Type I and Type II compliance lies in the duration and depth of the assessment

  1. SOC 2 Type I: This assessment evaluates the suitability and design of an organization’s controls at a specific point in time. It provides a snapshot of the organization’s control environment at the time of the assessment. SOC 2 Type I reports focus on the description of the organization’s systems and the suitability of the design of the controls in place to meet the specified criteria. However, it does not evaluate the operating effectiveness of these controls over time.
  2. SOC 2 Type II: This assessment goes beyond Type I and includes an evaluation of the operational effectiveness of the organization’s controls over a minimum period of six months. SOC 2 Type II reports not only assess the design of controls but also test whether these controls are operating effectively over an extended period. This type of assessment provides a more comprehensive understanding of how well the controls are functioning in practice and how consistent the organization is in maintaining them over time.

In summary, while SOC 2 Type I provides a snapshot of controls at a specific point in time, SOC 2 Type II offers a more thorough evaluation by assessing the effectiveness of controls over a period of time, typically 6 to 12 months. Many organizations aim for SOC 2 Type II compliance as it provides deeper insights into the ongoing reliability and effectiveness of their systems and controls.

Is Backrightup SOC 2 Type II compliant?

Yes that’s correct! Its important especially when dealing with backups that we treat your data with the utmost of importance and adhere with the Trust Services Criteria associated with SOC 2 compliance:

The Trust Services Criteria (TSC) are a set of principles and criteria developed by the (AICPA) to evaluate the effectiveness of controls within service organizations. These criteria are used as the basis for SOC 2 reports, which assess the security, availability, processing integrity, confidentiality, and privacy of systems and data.

There are five main Trust Services Criteria:

  1. Security: This criterion focuses on the protection of the system from unauthorized access, both physical and logical.
  2. Availability: This criterion assesses the accessibility of the system, ensuring that it is available for operation and use as agreed upon or required.
  3. Processing Integrity: This criterion evaluates whether system processing is complete, valid, accurate, timely, and authorized.
  4. Confidentiality: This criterion ensures that information designated as confidential is protected as agreed upon or required.
  5. Privacy: This criterion addresses the collection, use, retention, disclosure, and disposal of personal information in conformity with the commitments made to the client, user, or data subject.

Each of these criteria includes specific controls that organizations must implement and maintain to achieve compliance. Our SOC 2 report provides assurance to stakeholders regarding the effectiveness of these controls and the organization’s commitment to security, availability, processing integrity, confidentiality, and privacy.

Why is SOC2 Compliance important for your organization?

SOC 2 compliance establishes a level playing field when it comes to assessing a potential vendor or partner to work alongside. Particularly those that handle sensitive customer data or provide services to other businesses. Here are several reasons why your company should consider pursuing SOC 2 compliance:

  1. Customer Trust: Demonstrates commitment to protecting customer data, building trust and confidence.
  2. Competitive Advantage: Attracts clients who prioritize data security and compliance, expanding your customer base.
  3. Risk Management: Identifies and mitigates risks related to data security and privacy.
  4. Legal and Regulatory Compliance: Helps meet legal and regulatory requirements, reducing the risk of fines and penalties.
  5. Improved Internal Processes: Enhances security practices and operational efficiency within the organization.
  6. Vendor Management and Partnerships: Strengthens relationships with partners and attracts new business opportunities.
  7. Continuous Improvement: Encourages a culture of ongoing improvement in data security and privacy practices.

In essence, SOC 2 compliance is crucial for enhancing security, maintaining compliance, and building trust with customers and partners.

Why do Azure DevOps Backups Matter in your SOC2 Compliance?

In summary, code backups are a fundamental aspect of SOC 2 compliance because they support data integrity, availability, business continuity, and regulatory compliance. By implementing effective code and metadata backup procedures and regularly testing backup systems, your company can mitigate risks and demonstrate its commitment to protecting sensitive information and maintaining operational resilience – a key part of your SOC 2 journey.

Similar to backing up a database, creating a code backup is a method to swiftly restore your service for customers. This aligns directly with the Availability Trust Service Criteria (TSC) outlined previously.

If you cannot quickly restore your Azure DevOps backups and enable your team to continue working through their Azure DevOps work item tasks, the period of downtime you experience will become a crucial part of you complying to your SOC 2 certification.

In addition, lack of availability, cyber breaches or ransomware attacks which result in loss of code will no doubt affect the credibility your company works so hard to achieve with your customers

Therefore, maintaining code backups is essential for SOC 2 compliance and ensuring a dependable business operation.

Schedule a call below to chat more about your Azure DevOps Backups

Categories
Uncategorised

Why Backrightup is the Preferred Enterprise Grade Azure DevOps Backup Solution

Since originating from the collaboration with the US Department of Defense through Microsoft, Backrightup has evolved to secure Azure DevOps and GitHub environments globally, serving the most compliance-driven sectors, including financial services, government, engineering, and healthcare. This DNA underscores its capability to safeguard the most sensitive and critical data against a broad spectrum of DevOps risks, ranging from inadvertent deletions to sophisticated cyber threats. Trusted by the world’s largest organizations, Backrightup stands as a testament to Microsoft for unmatched security and resilience, ensuring that Azure DevOps data remains protected under all circumstances.

Comprehensive Coverage for Work Items and Boards

Backrightup’s unlimited backup for Work Items and Boards ensures that every attachment and interlinked item is meticulously preserved. This level of detailed backup maintains the integrity of complex project workflows, guaranteeing full recovery capability with top-tier encryption for utmost security.

Unmatched Git/TFVC Repository Backup

Acknowledging the critical value of source code, Backrightup delivers robust backup solutions for Git and TFVC repositories. It secures every line of code with unique encryption keys, offering developers the assurance that they can securely revert to any version at any time.

On-Demand Backup Usage

Integration with existing pipelines for unlimited on-demand backup capabilities demonstrates Backrightup’s flexibility. This allows teams to implement backups at any developmental stage, providing immediate data protection and peace of mind.

Full Spectrum Backup and Restore

Backrightup extends its protection to every component of Azure DevOps, from Pipelines and Releases to Wikis. This comprehensive approach ensures that the entire DevOps ecosystem is covered, leaving no aspect of your operations vulnerable.

Round-the-Clock Technical Support

Global technical support and restore assistance ensure that help is readily available, minimizing potential downtime and keeping business operations running smoothly.

Data Sovereignty and Flexible Retention

Backrightup’s flexible data retention policies and compliance with data sovereignty laws offer customizable solutions to meet a variety of organizational needs, aligning with legal and regulatory standards. As an example, Backrightup work with Financial Service organizations in the US, Canada, EU, Australia and New Zealand.

Continuous Innovation

A commitment to continuous improvement ensures that Backrightup remains at the industry forefront, with regular feature updates and product strategy reviews to meet evolving customer needs. Backrightup understand that every organization is different so work with customers to customization so the solution is integrated into their data governance and compliance requirements.

Dedicated Account Support

Dedicated training and support are provided to maximize the potential of Backrightup, ensuring a smooth onboarding process and optimized data protection strategies.

Proactive Reporting and Notifications

Comprehensive reporting and real-time notifications offer robust data monitoring and governance, keeping organizations management informed about the health and security of their data.

Tier 1 Security for Regulated Organizations

Backrightup meets the highest security standards required by regulated organizations, providing custom contracts, security assessments, and onboarding to ensure compliance and data protection.

Dedicated Restore Testing

Backrightup guarantee efficacy and work with their customers on restore testing and full reporting services, offering an additional layer of assurance during a disaster in the reliability of the backup and restore processes.

Conclusion

Backrightup is not merely a backup tool; it’s a comprehensive solution that underpins the data protection strategy, developed from high-stakes origins and trusted by leading organizations across the most regulated industries worldwide. Its coverage, flexible backup options, and dedicated support make it the definitive choice for securing Azure DevOps environments against any threat. With Backrightup, organizations ensure the continuity, integrity, and security of their most valuable digital assets, addressing compliance demands, and solidifying its status as the preferred Azure DevOps data protection solution.

For more information, get in touch to speak with one of our Azure DevOps Experts.

Categories
Uncategorised

Guide to GitHub Storage Limits [2023]: Tips, Tools, FAQs, Etc.

This guide provides a straightforward overview of GitHub storage limits and outlines effective ways to manage them.

GitHub offers a decent amount of storage for your Git repositories. 

However, GitHub sets file and repository size limits to make repositories easier to maintain and work with while keeping the platform running smoothly. 

GitHub’s storage limitations can be challenging when working with data and files of large sizes. 

The good news is that there are tips and tricks to help you overcome GitHub’s storage limits—starting with the best practices and recommended tools below.  

Table of Contents

3 Practical tips for working around GitHub storage limits

  • Create smaller files
  • Use Git Large File Storage 
  • Avoid pushing your file to GitHub

Tools to handle GitHub storage limits

  • Backrightup
  • Git LFS
  • BFG Repo Cleaner

Frequently asked questions

  • How do I know the amount of storage I use on GitHub?
  • How can I upload files larger than 100 MB to GitHub?
  • What are GitHub’s size limits?

Resources you will love

Overcome GitHub storage limitations

3 Practical tips for working around GitHub storage limits

Keep in mind the best practices below to handle limitations on GitHub storage and simplify managing large files. 

1. Create smaller files

Create smaller files from your big ones in GitHub to avoid taking up all the allowed storage limits. 

While this might not always be ideal, it can help you reduce your stored file sizes in GitHub. 

For example, if you use Python, import your data separately from your computing platform and save it as a specific data structure. 

Then, break down the data into smaller structures, export the smaller files separately, and delete the large file that takes up most of your GitHub storage.  

It can be a tedious solution so use it sparingly and only when necessary since it can take a lot of work. 

Creating smaller files also forces you to break down and separate data into groups when it should be a single file. It can lead to potential issues and adds more file clutter to your GitHub repositories.

2. Use Git Large File Storage 

One of the best ways to preserve your commit history and the project’s integrity is to use Git Large File Storage (LFS). 

Git LFS deals with large files by storing the files’ references in the repository but not the actual file. 

It creates a pointer file that acts as an actual file reference stored somewhere else (LFS server), working around Git’s architecture. 

GitHub can manage the pointer file within your repository. 

Plus, GitHub uses the pointer file as a map to your large file when you clone the repository down. 

Essentially, Git LFS intercepts the designated files when you commit and push in GitHub and migrates them to the LFS server. 

Once you install Git LFS on your local device, you can use three lines of code to install LFS in your repository and track the CSV files within.   

Git LFS also lets you look and view the files that are being tracked using a command line. 

After committing the file to your repository, use git-lfs-migrate to add it to the LFS and remove it from your Git history. 

The process can help you save on storage since you’re not storing the actual files within GitHub. 

However, LFS has a ceiling you can only exceed by paying the required fee. 

Discern and use common sense to determine whether using Git LFS (and potentially paying more) is the best option for you. 

3. Avoid pushing your file to GitHub

Another way to help you work around GitHub’s storage limits is to add the filename in your repository’s .gitignore file instead of sending the actual file to GitHub. 

This way, you can keep a local copy of your data and provide a URL to the data source in your project’s README. 

It’s not always a great option if you gathered and created your dataset, but it can be a good solution for data that’s already packaged on the web.

You can create a .gitignore file in your repository’s parent directory and store the file directories you want Git to ignore. 

Use a wildcard symbol (*) so you won’t need to manually add individual files and directories every time you make a new large file. 

Git will automatically ignore them so they won’t get uploaded to GitHub, saving storage space and preventing common error messages. 

Tools to handle GitHub storage limits

The following tools can help you manage your GitHub files and deal with the platform’s storage limits better. 

Backrightup

One of the ways to save storage space is to back up your GitHub repositories. 

This way, you can keep backups of your files and store them in other locations, freeing up space. 

Running regular backups also helps keep you from losing data in case of malicious software attacks, accidental deletions, server crashes, errors, and other issues. 

However, you want to simplify your GitHub backup process to lighten your workload and keep your workflows moving seamlessly. 

An excellent solution is to use Backrightup, our automated backup platform and service for Azure DevOps, Gitlab, Bitbucket, and GitHub. 

Our backup service automates your GitHub backup and restores, making recovering your repository and data quick and easy. 

Our solution also provides full backup storage to your preferred locations, and you won’t need to maintain your backup scripts. 

Git LFS

Git LFS can track the files beyond GitHub’s storage size limit.

As mentioned, Git LFS makes pointer files that reference the actual files usually stored in the LFS server. 

Git LFS lets you store files up to the following:

  • 2 GB for GitHub free
  • 2 GB for GitHub Pro
  • 4 GB for GitHub Team
  • 5 GB for GitHub Enterprise Cloud

Git LFS silently rejects new files you add to the repository if you exceed the 5GB limit. 

BFG Repo Cleaner

The BFG is an alternative to git-filter-branch that allow for easier and faster cleansing of bad data from your Git repository history, freeing up GitHub storage space. 

The BFG Repo Cleaner can help you clean up massive files and remove credentials, passwords, and other confidential data stored in GitHub. 

You can even use Scala language when necessary to customize the BFG. 

Frequently asked questions

Below are the common questions people ask about GitHub storage limits. 

1. How do I know the amount of storage I use on GitHub?

You can view your GitHub Packages usage for your personal account in the Access section of the GitHub sidebar. 

Click Billing and plans. You can see your usage for data transfer details under GitHub Packages. 

To see your storage usage for GitHub Packages and GitHub Actions, go to Storage for Actions and Packages. 

2. How can I upload files larger than 100 MB to GitHub?

GitHub places hard limits on file and repository sizes. 

It has a 100MB file limit, so you’ll need to use Git LFS. 

You can place git-lfs into your $PATH to download and install it.

3. What are GitHub’s size limits?

GitHub limits the maximum file size (or sizes) you can add to your repository to 50 MB. 

File sizes larger than 50 MB will get you a warning from Git. 

It is strongly recommended to keep your repositories small, ideally less than one to five GB, to minimize performance impact on GitHub. 

Resources you will love

Overcome GitHub storage limitations

GitHub’s storage limits might not always be ideal for you and your work, but there are strategic ways to work around these limitations. 

You can create smaller files and use reliable tools such as Backrightup to back up your GitHub repositories easily and save storage space. 
Try Backrightup now to experience our GitHub backup solution’s benefits.

Categories
Uncategorised

How to Organize GitHub Repositories

Learn how to organize GitHub repositories to avoid the chaos of codes, data, and projects being all over the place. 

Failing to organize your GitHub repositories can cause inefficiencies in your workflows since your team members need to sort through files and folders to find anything. 

The good news is that the tips and tools below can simplify organizing your GitHub backup files and repositories, making it uber-easy to sort, locate, and access what you need. 

1. Classify your repository with topics

Adding topics makes it easier for other users to find and contribute to your project. 

Include topics in your repositories that are related to your project’s intended affinity groups, subject area, purpose, and other essential qualities.   

Topics in GitHub allow you to do the following:

  • Explore repositories in specific subject areas
  • Find projects to add or contribute to
  • Uncover new solutions to certain problems

You can find topics on a repository’s main page. 

Click a topic name to view related topics and a list of other repositories categorized with the topic. 

Classify your repository with topics

Find the most searched and used topics here.

You can add any topic to the repo if you’re a repository admin. 

Use helpful topic classifications (and whatever makes sense) based on your repository’s intended purpose, such as community, language, or subject area.  

GitHub analyzes content in public repositories and generates recommended topics that admins can reject or accept. 

GitHub won’t analyze private repository content and will not provide topic suggestions. 

Private and public repositories can have topics, but you will only see private repos that you have access to within topic search results. 

Important note: Creating a topic within a private repository means your topic names are always public.  

Add topics by going to your repository’s main page. 

Click the gear icon on the right side of About.

Go to settings

Type in the topic you want to add to your repo (under Topics) and include a space.

Type in the topic you want to add to your repo

Click Save changes when you’re done adding topics. 

Save changes when you’re done adding topics

You’re all set. 

There is no right or wrong way to organize your GitHub repository. 

However, you can take inspiration from other platforms and alternatives to GitHub that might offer similar or unique structuring and sorting ideas for repositories.  

2. Create a basic folder structure

If there are GitHub security best practices, there are also tips and tricks to structure your repositories. 

Start by implementing a basic folder structure that consists of the following:

  • A test Folder to store your integration, unit, and other tests. 
  • An src Folder for your source code (except if you use languages that use headers or if you have an application framework).
  • A .build Folder that contains all build process-related scripts, such as Docker compose and PowerShell. 
  • A .config Folder which should have the local configuration related to set up on a local machine.  
  • A tools Folder that acts as a convenience directory. It should contain scripts for automating tasks in your software projects, such as rename and build scripts. The folder typically contains .cmd and .sh files. 
  • A doc Folder containing your documentation.
  • A dep Folder that has the directory of your stored dependencies. 
  • A samples Folder that provides “Hello World” & Co code supporting the documentation. 
  • A res Folder for all your project’s static resources, such as images. 

Add other basic repo folders necessary to your project and team. 

For instance, create a designated folder for your GitHub enterprise backup

3. Make special files and folders

Create dedicated repository folders for your special files, including the following:

  • An ISSUE_TEMPLATE FILE to let project contributors instantly see the template’s contents within the issues’ body when you add an issue template to your repository. 

Templates allow you to standardize and customize the information you want to include when contributors open issues. 

Create an ISSUE_TEMPLATE/ directory within your project root to add multiple repository issue templates.  

Check this list to see multiple issues and pull request templates. 

  • A PULL_REQUEST_TEMPLATE File to instantly display the template’s content within the pull request body when adding a PULL_REQUEST_TEMPLATE file to your repository. 
  • A README File (or README.txt and README.md) answers your project’s what, why, and how. GitHub recognizes and automatically surfaces the README to the repository visitors. 
  • A CHANGELOG File describes what is happening in your repositories, such as software updates, bug fixes, and version number increases.  
  • A LICENSE File explains the legal licensing, including restrictions, rights, and regulations (among others). 
  • A SECURITY File contains your project’s security policies and a list of versions currently maintained with security updates. The file also provides instructions on how users can submit a vulnerability report. 
  • A CODEOWNERS File specifies the individuals or teams responsible for code within a repository. Code owners get automatic requests for review when users open a pull request that changes the code they own. 

Someone with owner or admin permissions who enables required reviews can also require approval (optional) from a code owner before the author merges a pull request within the repository. 

Also, consider organizing your backup files and repositories in special files and folders (when necessary). 

Reliable GitHub backup tools will leave your backups as is when you restore, but it can be good practice to classify your repositories for optimum team collaboration and efficiency.

4. Set up project boards

Using project boards, eliminate the chaos by organizing your open-source projects, including issues and pull requests within your GitHub repositories.  

Doing so makes it easier for you and your teams to visualize the work that is in progress or yet to start. 

GitHub’s project boards provide a platform to organize and visualize projects into separate columns. 

You can use Repository boards in one repository and organization boards within a GitHub organization across various repos (but private to members of the organization).

If you have tons of backup files to sort or consolidate, consider creating Kanban-style project boards when learning how to backup GitHub repository

Your choice of a project board (or project boards) depends on your project’s size and structure. 

For example, you could use boards for documentation and development at the organization level and specific repository work, such as a community management board.      

Bring order to our GitHub repositories for better efficiency

Follow the best practices to organize your GitHub repositories, whether you are starting new private or open-source projects. 

A well-organized GitHub repository allows for better team collaboration and contribution, a more elegant project structure, and seamless workflows. 

Organize your GitHub backups as well to get the same results. Use reliable backup services such as Backrightup. 

Register for a Backrightup account to see how it works and benefits your team and projects.  

Categories
Uncategorised

How to Delete a Repository in GitHub

Learn how to delete a respository in GitHub by following the steps outlined below. (Spoiler alert: The steps are uber easy and quick to pull off.)

Users delete a GitHub repository for several reasons: to remove clutter, erase mistakes, focus on other projects, and get rid of outdated code and data. 

While deleting GitHub repositories is easy, you must know the right way to do it, otherwise, you might only remove local copies while the remote repositories continue to exist.

(Suggested Reading: Top 5 Alternatives to GitHub)

This guide covers the methods and steps to delete a GitHub repo, including walkthroughs and mini-tutorials.  

1. Delete your repository on the GitHub website 

Deleting your GitHub repository on GitHub.com is a straightforward process with these steps. 

Step 1: Log in to your GitHub account

Go to github.com and sign in with your username (or email address) and password.

Log in to your GitHub account

Click Sign in when you’re done.

Step 2: Go to your repositories library

Go to your repositories library by clicking your profile image and selecting Your repositories from the drop-down list. 

 Go to your repositories library

A new page will display all your existing repositories. 

Step 3: Go to your repository settings

Navigate to the repository you want to remove by clicking on its title. 
Then, click Settings on the top toolbar.

Go to your repository settings

Step 4: Enter the Danger Zone section

You need to get inside GitHub’s Danger Zone to delete repositories. 

Scroll down and click on the Delete this repository button.

Enter the Danger Zone section

Step 5. Delete the repository

GitHub will display warnings before you proceed with deleting your repository. 

Delete the repository

Review the repository you want to delete, or better yet, learn how to backup GitHub repository, especially if you’re deleting it because you want to move to another platform. 

Also, deleting a private repository removes all the repository’s forks.  

After reading the warnings, type in the repository name in the designated field. 

Click on the I understand the consequences, delete this repository to confirm the deletion. Your repository will be deleted. 

You’ll be redirected to GitHub’s main page with a banner that shows that the repository has been successfully deleted. 

Important reminders when deleting a repository in GitHub via the web:

  • Only members with organization owner privileges or repository admin permissions can delete an organization’s repository.
  • Only organization owners can delete an organization’s repositories if the Allow members to delete or transfer for this organization is disabled. Learn more about repository roles for organizations from this GitHub documentation.
  • Deleting a public repository won’t delete forks in the repository.  
  • Go over your GitHub backup if you want copies of your repository but want to remove the original from its current location. Consider archiving your repositories before deleting them permanently. 
  • Unless the repository was part of a fork network that isn’t empty, you could restore a deleted repository within 90 days. 

A fork network has a parent repository and the repository’s forks (including the forks of the repository’s forks). 

You can’t restore a repository that was previously part of a fork network unless the other network repositories are deleted or detached from the network. Learn more about forks here

  • You can restore a successfully deleted GitHub repository that was part of a network (and is not currently empty) by contacting GitHub support.
  • It can take an hour after you delete the GitHub repository for the repository to be restored.  
  • Restoring GitHub repositories won’t restore team permissions or attachments, and Issues that get restored won’t be labeled. 

Additionally, reliable GitHub backup tools such as Backrightup allow you to easily restore deleted repositories. 

There you have it. You’ve just deleted a repository in your GitHub organization in five quick and easy steps. 

2. Delete a local GitHub repository

You want to delete a remote GitHub repository—that is, delete the copy you received by cloning the remote repository. 

Use the “rm -rf” on the .git file in your Git repository’s root to delete a local Git repository. 

It should look like this:

$ rm -rf <repo_folder>/.git

Deleting the .git file removes the GitHub repository without deleting the files located in your project folder. 

Consequently, this allows you to initialize a new Git or GitHub repository with “git init”, include a remote using “git remote add”, and begin committing new files.

$ git init

$ git remote add origin [email protected]:<user>/<repository>.git

$ git push -u origin master

Be mindful when using the git push command since you’ll be asked to give the upstream branch without the “-u” (for upstream branch). 

Like implementing GitHub security best practices, reviewing your existing repositories and backups is always a good idea before deleting anything. 

Doing so helps ensure you don’t accidentally delete repositories you shouldn’t. 

It can also keep you from losing critical files and data that might impact your GitHub compliance

There are instances where you are the organization owner or have admin permissions, but the option to delete a GitHub repository isn’t available (appears grayed out). 

Try to clear your cache and cookies since these can sometimes cause web pages to load slowly, making the delete repository option unavailable.

In-progress updates on the GitHub website can also cause errors. Come back later to see if the issue has been resolved. 

This is why it’s important to run a GitHub enterprise backup so you can restore a repository you accidentally deleted because of a glitch or error on the website.  

Your last resort is to contact GitHub support since problems with your account can cause the potential issues. 

Delete GitHub repositories quickly and easily

Removing GitHub repositories can be simple and fast when you know how to do it correctly. 

Learn from this guide’s tips to delete GitHub repository without losing critical data and eliminating clutter. 

While you’re at it, invest in robust GitHub backup service solutions such as Backrightup. 

The tool allows hassle-free, automated GitHub repository backup and restore, so you can easily recover your backups and accidentally deleted repositories.  
Register for a Backrightup account to see how the platform works and enjoy its benefits.