

Performing regular GitLab backups will help secure your crucial business codes.
After all, having backups can protect you against issues that cause data loss, such as accidental deletion, data corruption, rogue third-party apps, server crashes, and integration errors (among others).
However, running your GitLab backups isn’t always easy.
You might miss a few steps or set up your configurations incorrectly if you don’t know how to perform your GitLab backups properly. To ensure your backups push through without a hitch, continue reading this guide.
GitLab backup configuration tips
Even if it’s tedious to run your GitLab backups, you need to be religious about doing it. Otherwise, you leave your GitLab software vulnerable to cyber attacks, among other issues, which could lead to data loss.
Follow these GitLab backup configuration tips.
Create an Omnibus-GitLab configuration backup
Secure a copy of the /etc/gitlab directory to prevent potential data loss. You can do this by getting copies of these files:
- The file that contains your application’s configuration parameters, such as /etc/gitlab/gitlab.rb.
- The file that has the database encryption keys that protect your sensitive data in the SQL database. For example, /etc/gitlab/gitlab-secrets.json.
Make a GitLab system backup.
Backup the entire system using GitLab’s command-line interface and include these instances:
- GitLab pages content
- Git repositories
- Attachments
- Container Registry images
- Database
- LFS objects
- Snippets
- Group wikis
- CI/CD job output logs
- CI/CD job artifacts
Create a backup system using this command:
sudo gitlab-rake gitlab:backup:create
To access the backup file, go to the /var/opt/gitlab/backups directory.
Create daily backups
Secure your GitLab configuration by running daily backups. One way of doing this is to edit the cron table for user root.
sudo crontab -e -u root
Make a tar file with the /etc/gitlab/ contents using this command:
15 04 * * 2-6 gitlab-ctl backup-etc && cd /etc/gitlab/config_backup && cp $(ls -t | head -n1) /secret/gitlab/backups/
Additionally, run multiple backups daily, weekly, and monthly to minimize potential data losses should any of your backups fail.
It’s also good practice to automate your backup process and track it to ensure it’s running correctly, allowing you to catch any potential issues that might lead to data corruption or loss.
Why backup GitLab offsite
While regularly running GitLab backup is crucial, it’s equally important to keep your backups offsite as an additional protection measure for your GitLab reserves.
This helps you secure your repositories and important files from risks and unexpected issues, such as GitLab system outages and even data breaches due to hacking.
If you’re still on the fence about this, consider these other reasons why you need a GitLab backup offsite.
Reduced workload
Running backups using traditional software often involves manual work, which is time-consuming and labor-intensive.
However, offsite backups through third-party GitLab backup platforms can minimize your workload through automation.
Automated GitLab backups save you tons of time and energy, allowing you to focus more on your critical DevOps tasks.
Reliability
Offsite backups other than GitLab offer reliability by letting you schedule and automate regular backups of your data, files, and other items.
Offsite backup platforms have multiple remote backup servers, allowing you to save your data in various locations. This minimizes the risk of data loss in case your current server crashes or experiences other technical issues.
Easy backup data management
Managing your bulk data manually and by yourself can be a nightmare.
However, offsite backup platforms can help you automate this process, managing and providing the required maintenance for your backups on the backend for you.
You can retrieve a file easily by checking your backup locations, and the provider or platform does the rest.
Cost efficiency
Offsite backups can save you some money by letting you access unlimited storage for a monthly fee.
This offers cost-efficiency when doing backups, especially if you need to back up a network of repositories and files from various computer systems within a large organization.
Third-party offsite backup providers offer automated backups that meet your organization’s storage needs while saving you from paying exorbitant fees.
Use Backrightup, an excellent solution to help you ensure seamless and secure GitLab backups offsite, reduce data loss risks, save operational costs, and speed up your backup jobs (more on this later).
Backrightup provides a convenient solution, giving you the peace of mind of having secure and safe GitLab backups with its reliable, easy-to-run, and automated offsite backup process.
How to Backup Gitlab: 4 Easy Steps
You can run GitLab backups manually using specific commands for Omnibus and Source installation.
However, this can take A LOT of time and energy and the manual process won’t back up your SSL certificates, system files, and configuration files. This can be a huge bummer if you want to back up everything in one go.
You’re better off automating your GitLab backups to streamline the process and cover more ground.
You can run your GitLab backup through automated workflows using Cron Jobs, a time-based scheduler that lets you run recurring backups according to your set intervals.
However, an easier and faster way to set up and run your GitLab backup configuration is through Backrightup.
Backrightup is a flexible service that automates backing up and restoring your Azure DevOps instance.
The steps below show how to create your backups using Backrightup.
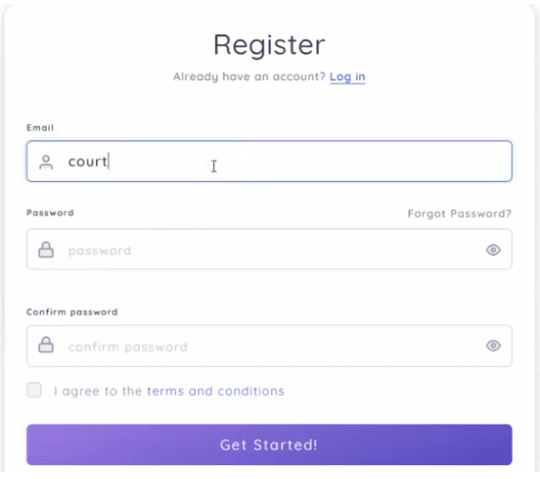
Step 1: Setup your account
On the Backrightup website, register for an account, then log in.
The software begins backing up your GitLab configurations the minute you log in to your account.
Step 2: View your backups
Under the Projects tab, click BackRightUp.
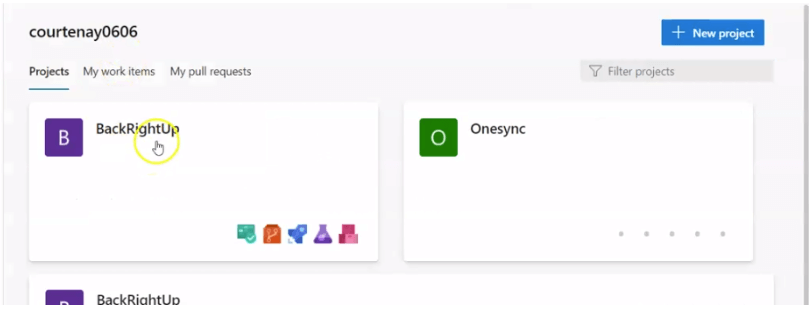
The left side panel of the interface shows the list of options containing your GitLab repositories and other items. Access and view your backups from there.
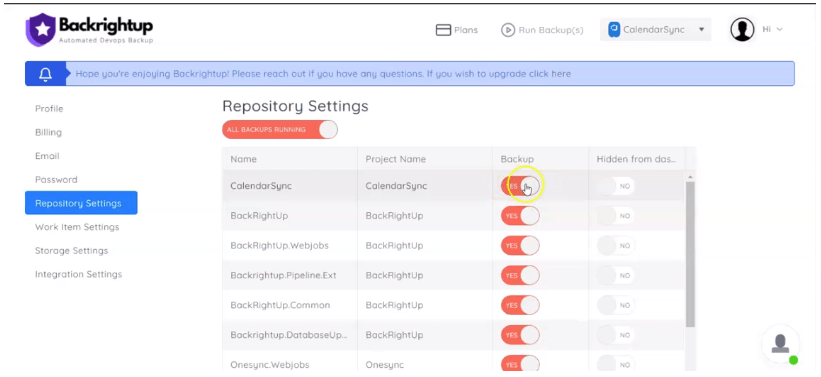
Step 3: Turn on backups for specific items
To enable (or disable) automatic backups for your specific items, navigate to Settings, then Repository Settings.
Click the Backup switch button to YES on the items you want to backup.
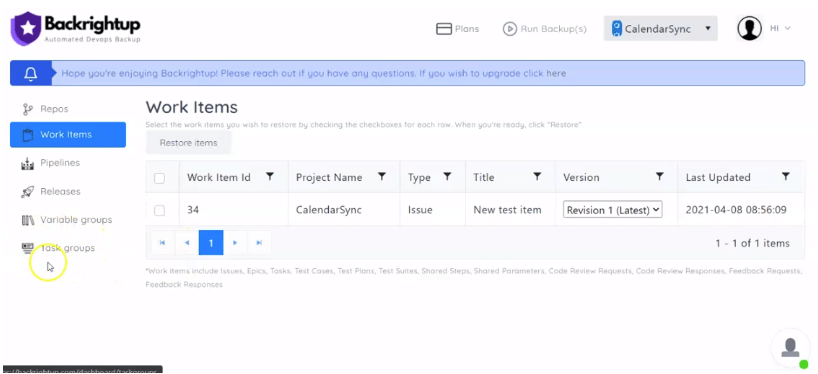
Step 4: Restore items
Click the Restore Items options at the top left side of the Work Items table to restore your updated items.
Automate your GitLab backups to streamline managing your repositories and other critical data while eliminating tedious, manual work and minimizing risks of data loss.
With Backrightup, you can configure your GitLab backups once, and the software does the rest automatically, saving you from running time-sucking, tedious manual backups.
Top GitLab integrations
The right GitLab integrations can boost your system’s functionality.
It can help you address issues in your app that lead to lower code stability, heavier workloads that increase your work hours, and inefficient collaboration.
Third-party services and tools also offer features to help you automate regular GitLab backups and streamline your code management process.
That being said, below are some of the best GitLab integrations.
GitLab Jira Integration
Integrating GitLab and Jira software can help you manage your application better, including the following:
- Connect all your GitLab projects within one namespace
- Integrate one GitLab project with all Jira instances
- Track and unpack potential Jira issues using GitLab, allowing you to detect and link them via merge requests and commits
- Cross-reference your GitLab projects’ activities
GitLab Jenkins Integration
Integrate Jenkins with GitLab to automate maintaining your deployed apps and code functionalities.
For instance, you can create your projects in Jenkins, then get the results on GitLab through automated build, which helps you verify your project to detect potential issues early on.
This also allows you to monitor and back up data seamlessly using both apps, speeding up your configuration process.
GitLab Flowdock Integration
If you’re an organization that provides transparent workflow management services or want to collaborate with other developers through GitLab, integrate FlowDock, a ChatOps app.
Integrating the app lets you send alerts from GitLab to Flowdock flows. You can also get notifications to keep you updated, helping you establish an organized project setup.
GitLab Pivotal Tracker Integration
Integrating Pivotal Tracker to GitLab allows you to automate pull requests, commits, and branches to ensure proper connection to appropriate stories.
The integration also lets you track your customer support apps and any bug issues, so you’re always up-to-date on potential project problems.
Additionally, the Pivotal Tracker integration allows you to automate updating your story states with a special commit message syntax. This helps you keep records of all your GitLab data.
GitLab Datadog Integration
You can CI/CD your pipeline and job information from GitLab to Datadog for troubleshooting when you integrate these apps.
Datadog searches your GitLab projects and repositories for all types of performance issues and job failures, then troubleshoots them automatically.
The app can also do this for your bulk data, helping you keep your repositories and projects safe from GitLab server breakdowns and other system issues.
Additional tip: Keep track of and organize large proportions of your GitLab data while reducing manual work using Backrightup.
Backrightup’s automated process allows you to back up all your GitLab data, such as repositories and source codes, effortlessly and seamlessly.
How to clone GitLab repositories
Cloning your GitLab repositories can save you huge chunks of your time and effort.
When you clone your repository, the files within the remote repository get downloaded to your computer, creating a connection.
The connection requires your credentials, and you can use either HTTPS or SSH. The steps below show how you can clone your GitLab repositories using the two methods.
Clone with SSH
Clone your repositories using SSH when you want to authenticate once.
1. Open the SSH documentation and follow the instructions on authentication with GitLab.
2. Navigate to the project’s landing page, click Clone, then copy the Clone with SSH URL.
3. Open a terminal, then go to the directory where you want to clone your files. GitLab will automatically create a folder with the name of the repository and download the files within the folder.
4. Run the common below:
git clone [email protected]:gitlab-tests/sample-project.git
5. Navigate to the new directory to view the files.
cd sample-project
You can also open your cloned repository directly in Visual Studio Code.
Clone with HTTPS
You’re better off cloning your repositories with HTTPS when you want to authenticate every time you execute an operation between GitLab and your computer.
Follow these steps:
1. Similar to cloning with SSH, navigate to your project’s landing page and copy the Clone with HTTPS URL.
2. Next, open a terminal and go to your desired directory (where you want to clone your files).
3. Run this command:
git clone https://gitlab.com/gitlab-tests/sample-project.git
4. Input your username and password. If you enabled two-factor authentication (2FA), use a Personal Access Token with read_repository. The other option is to use write_repository permissions instead of your GitLab account’s password.
Use your account’s password if you disabled 2FA.
5. View the files by going to the new directory:
cd sample-project
Additional tip: If you type in your password incorrectly (on Windows) more than once and get the Access denied prompt, add your namespace (group or username) to the path.
Here’s an example of what it should look like:
git clone https://[email protected]/gitlab-org/gitlab.git.
Run error-free GitLab backups
Configuring and running GitLab backups can be a long and complex process when you’re doing everything on your own.
Learn the importance of running GitLab backups (on and offsite), how to configure them properly, and why automated workflows are better options.
With the help of Backrightup, you can streamline your GitLab Backups while reducing data loss risks and exerting minimum effort.
Backrightup does the heavy lifting for you, helping you maintain repositories and projects efficiently and ensuring your data remains safe and intact.