Protecting your Azure DevOps and GitHub data is becoming increasingly prioritized for organizations when they realize relying solely on native backup solutions like Microsoft’s built-in Azure DevOps backups restrictive retention periods and lack of granularity introduces significant limitations, increasing operational and compliance risk.
Organizations worldwide trust solutions like Backrightup to protect their most vital assets, including leading companies such as Assurant, Nuvei, WelbeHealth, Sycurio, Panoramic Health, Telstra, Manitoba, and Kering. While native solutions provide basic backup functionality, they fall short of addressing the nuanced needs of compliance, operational efficiency, and risk management.
Below are the key drivers organizations focus on when ensuring the effective protection of DevOps data and how Backrightup helps them remain secure, compliant, and resilient.
1. Inadequate Native Backup Capabilities
Relying solely on native backup solutions like Microsoft’s built-in Azure DevOps backups introduces significant limitations:
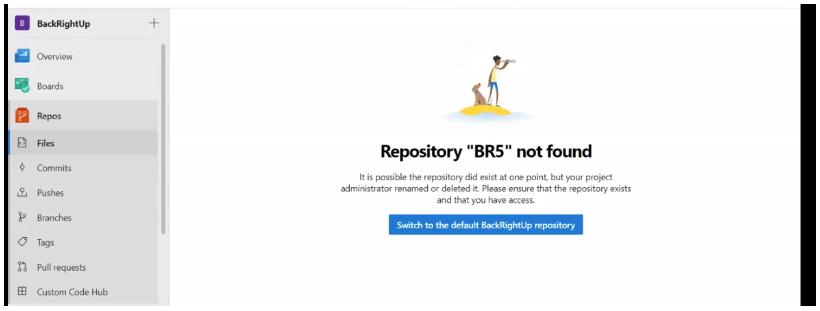
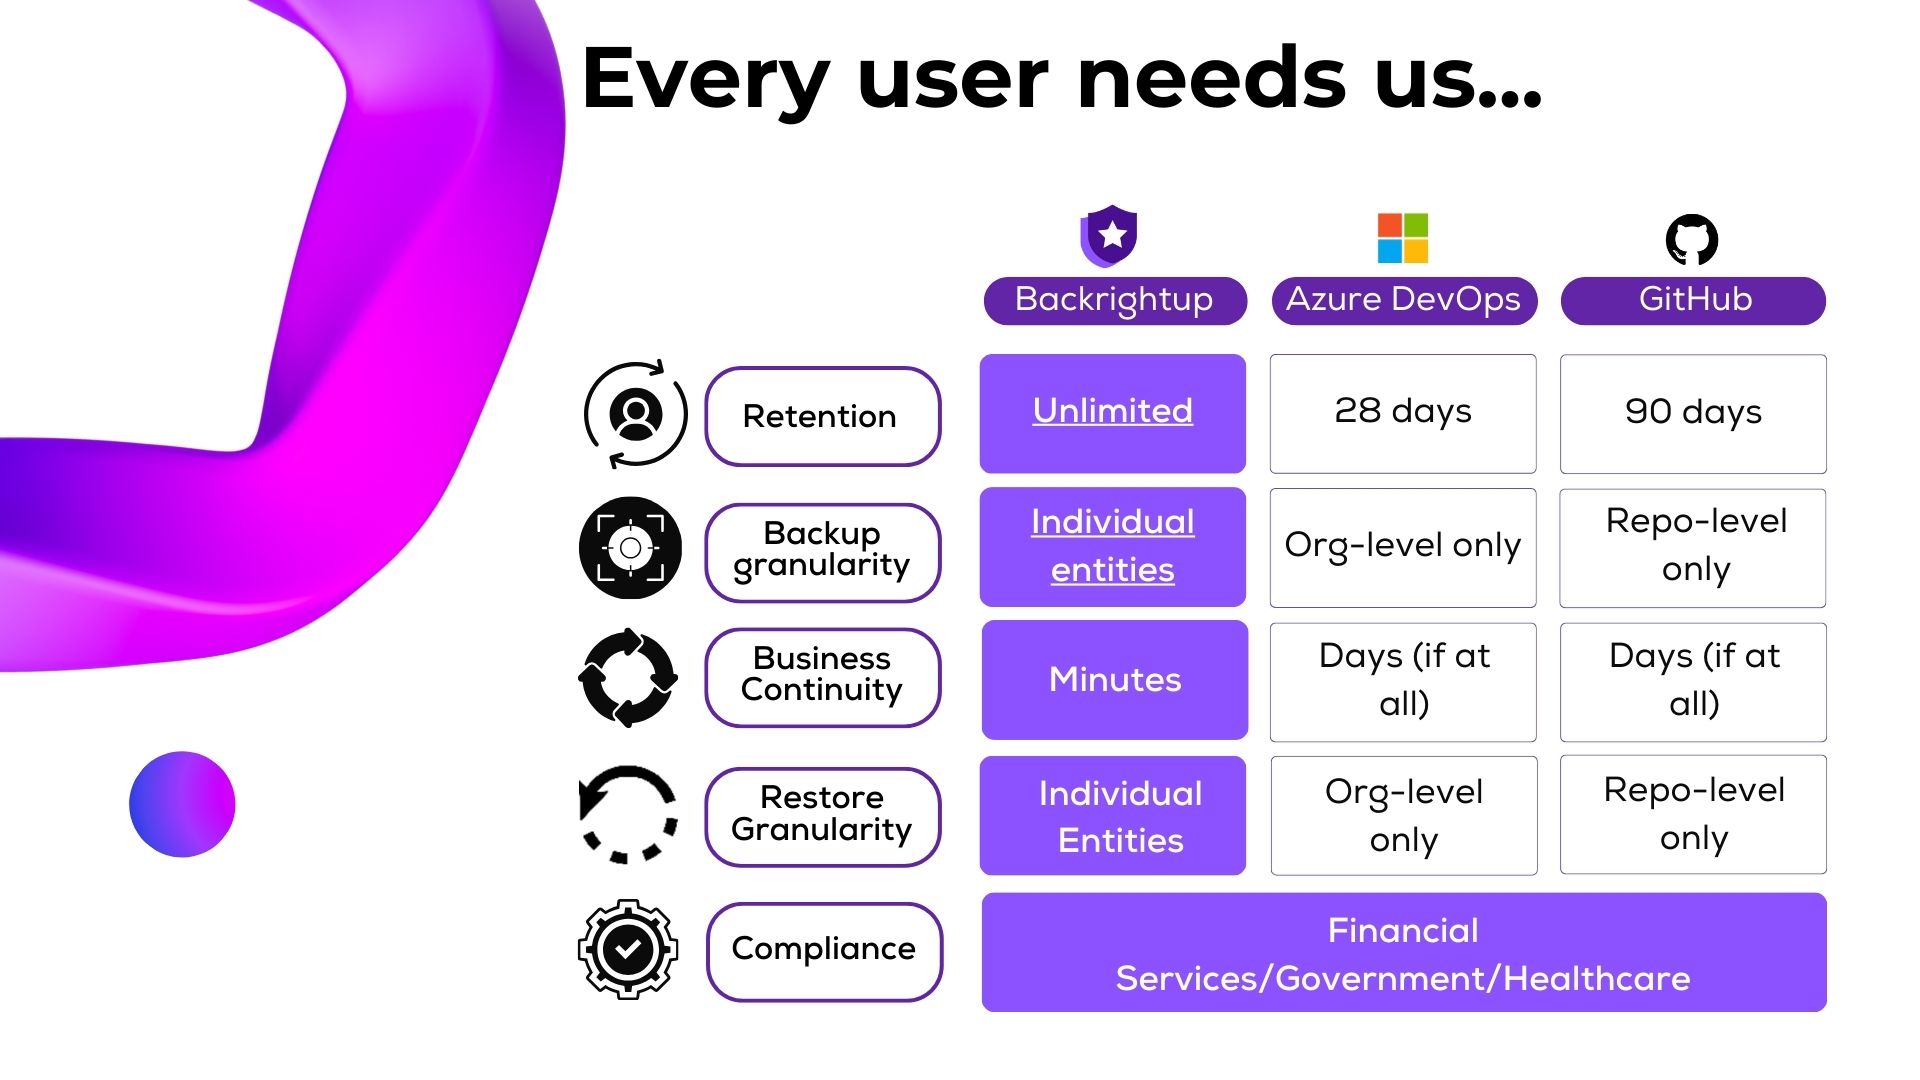
- Lack of Granularity: Native solutions don’t allow for targeted restoration of specific assets such as pipelines, boards, or individual work items, leaving organizations vulnerable to gaps in recovery.
- Short Retention Periods: Built-in backups offer only a 28-day retention window, insufficient for meeting long-term compliance or operational recovery needs.
Use Case: A financial services company experienced a critical failure in their Azure DevOps pipelines due to accidental deletion. Native backups couldn’t restore specific pipelines, leading to significant project delays.
With Backrightup, they quickly recovered the deleted pipelines, ensuring project continuity and avoiding costly downtime.
Backrightup closes these gaps by providing comprehensive backup capabilities designed for granular restoration and extended retention, ensuring your critical DevOps assets are always protected.
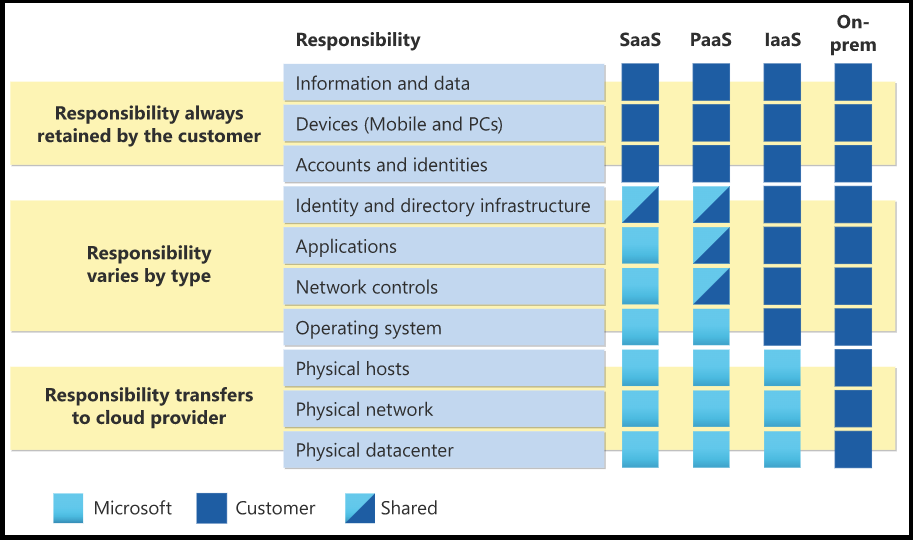
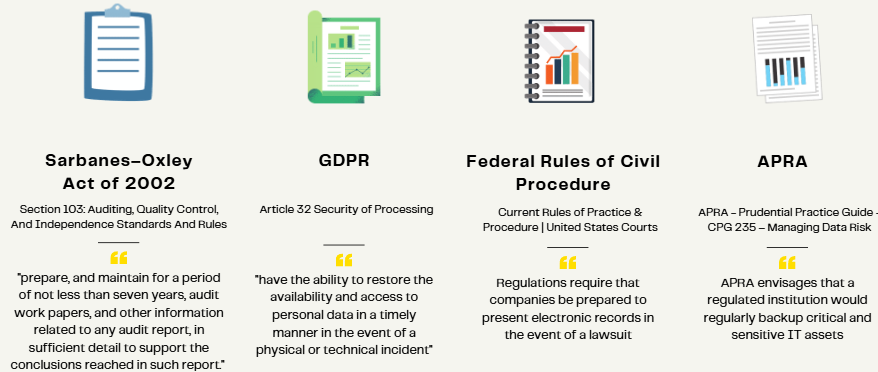
2. Compliance and Regulatory Requirements
Compliance remains a cornerstone of modern IT governance, with strict requirements dictating how data is handled and protected:
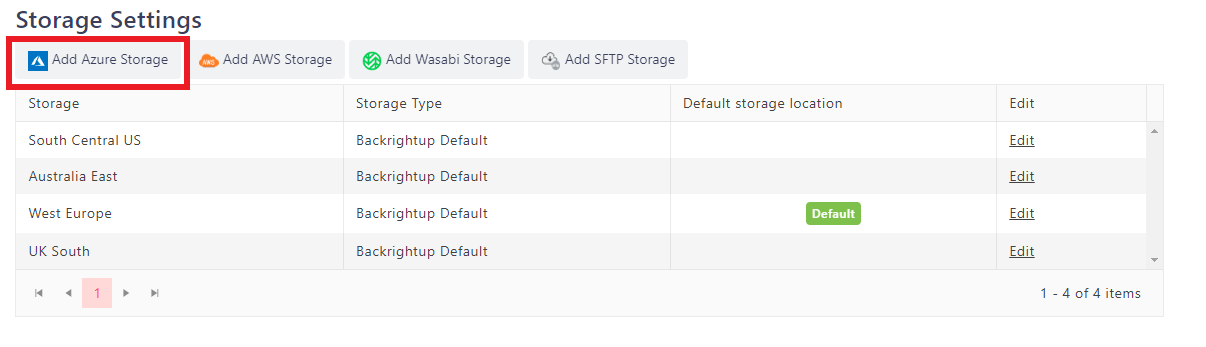
- Geographic Data Restrictions: Organizations often need data to remain within specific regions, such as the continental U.S. or a defined data center (e.g., South Central US region).
- Encryption and Key Management: The ability to own and manage encryption keys with immutability is crucial to meet government and audit standards.
- Detailed Audit Trails: Agencies like BDO or the Office of the Comptroller require comprehensive reporting on backup activities, restores, and overall data integrity.
Use Case: A multinational healthcare organization needed to comply with strict geographic data restrictions and encryption standards for sensitive patient information.
They leveraged Backrightup to ensure all backups remained within designated regions and implemented custom encryption key management to satisfy stringent audit requirements.
Backrightup meets these demands with advanced compliance features, providing full control over encryption keys, data localization, and audit-ready reporting.
3. Operational Efficiency and Risk Mitigation
The inability to recover critical DevOps data efficiently can bring operations to a standstill:
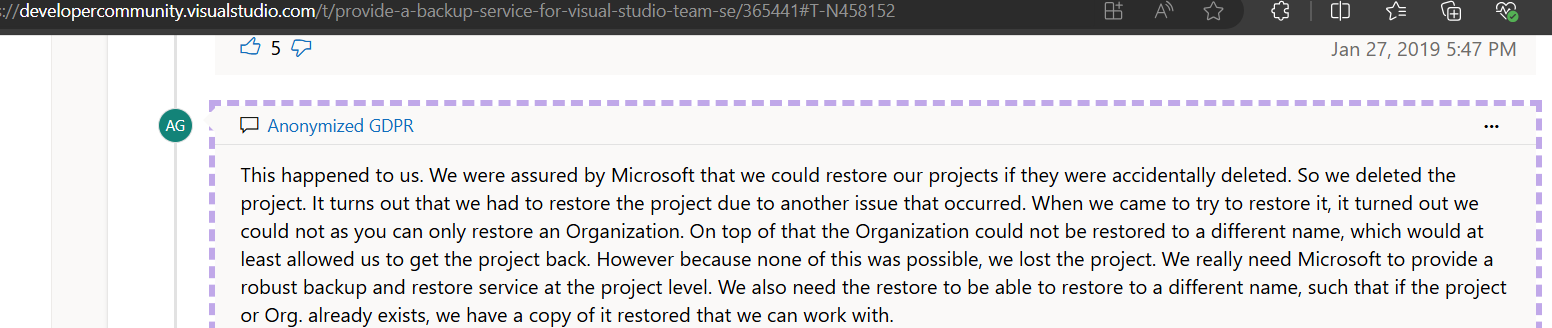
- Critical Gaps in Coverage: Many third-party solutions overlook Azure DevOps data, leaving repositories, pipelines, and configurations unprotected.
- Granular Recovery Needs: Organizations must be able to quickly restore individual items, such as a mistakenly deleted pipeline, to minimize downtime.
- Seamless Continuity: Ensuring rapid recovery with minimal disruption is vital to maintaining operational resilience and avoiding costly delays.
Use Case: A tech startup, with restricted resources, inadvertently deleted a repository containing core application code. The inability to restore individual items efficiently with native tools posed a risk to their go-to-market timeline.
Backrightup’s granular recovery capabilities enabled them to restore the repository instantly, minimizing operational disruptions.
Backrightup bridges these gaps by enabling quick, precise restores and ensuring business continuity even in the face of accidental deletions or misconfigurations.
4. Auditable Reporting and Visibility
Without clear visibility into backup and restore activities, organizations face heightened risks during audits and internal reviews:
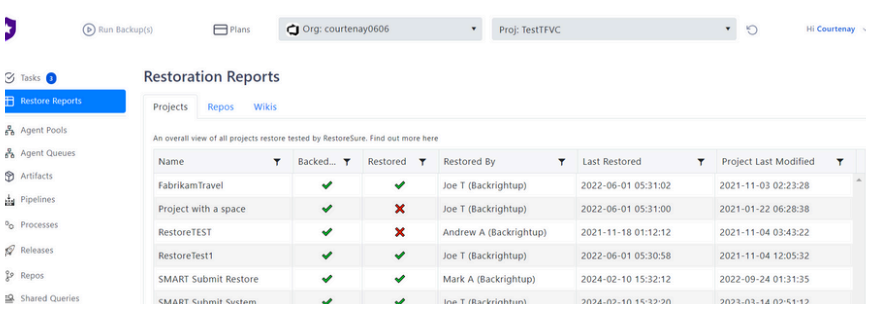
- Comprehensive Reporting: Auditors require detailed reports showing backup successes and failures, restore logs, and user activity.
- Visibility Gaps: Many existing solutions fail to provide real-time insight into what data is protected, leaving organizations vulnerable in compliance scenarios.
Use Case: An e-commerce company undergoing a compliance audit faced challenges proving backup and restore integrity due to incomplete reporting from their previous solution.
Using Backrightup, they provided auditors with comprehensive logs detailing backup successes, failures, and restore activities, passing the audit with confidence.
Backrightup offers robust reporting tools that provide complete transparency, enabling teams to confidently demonstrate compliance during audits.
5. Scalability and Future-Proofing
As organizations grow, their data protection solutions must scale seamlessly:
- Lightweight and Flexible Solutions: Teams are moving away from heavy, resource-intensive platforms like Commvault in favor of more agile, easy-to-integrate tools.
- Integration with Existing Systems: Backrightup integrates effortlessly with your existing tech stack, covering Azure DevOps and GitHub backups without adding complexity.
Use Case: A growing DevOps consultancy scaled from managing 50 repositories to 500 across multiple clients. Their legacy backup tool became resource-intensive and complex to manage.
Backrightup’s lightweight solution scaled seamlessly with their operations, integrating into their existing tech stack without adding administrative overhead.
This scalability ensures your backup solution grows with your organization, maintaining efficiency and adaptability.
6. Proactive Approach to Risk Management
A reactive approach to data protection is no longer viable in today’s high-stakes environment:
- Prevention Over Reaction: Organizations recognize the importance of mitigating risks before they escalate, particularly given Azure DevOps’ pivotal role in their operations.
- Critical Asset Protection: Even limited incidents can have outsized impacts, making proactive data management essential.
Use Case: A global retailer faced ransomware threats targeting their Azure DevOps pipelines.
By deploying Backrightup, they proactively secured their repositories with immutable backups, ensuring rapid recovery in the event of an attack and safeguarding their critical infrastructure.
Backrightup enables proactive risk management by delivering reliable protection and peace of mind for critical DevOps assets.
Conclusion
To achieve operational resilience, compliance, and robust data protection, organizations need a backup solution tailored to Azure DevOps and GitHub’s unique demands. By addressing these key drivers, solutions like Backrightup empower businesses to safeguard their critical assets, streamline audit processes, and ensure seamless recovery when it matters most.
From industry leaders like Assurant and Nuvei to global giants like Kering and Telstra, organizations trust Backrightup to deliver the reliability and performance they need so they don’t slow down.